
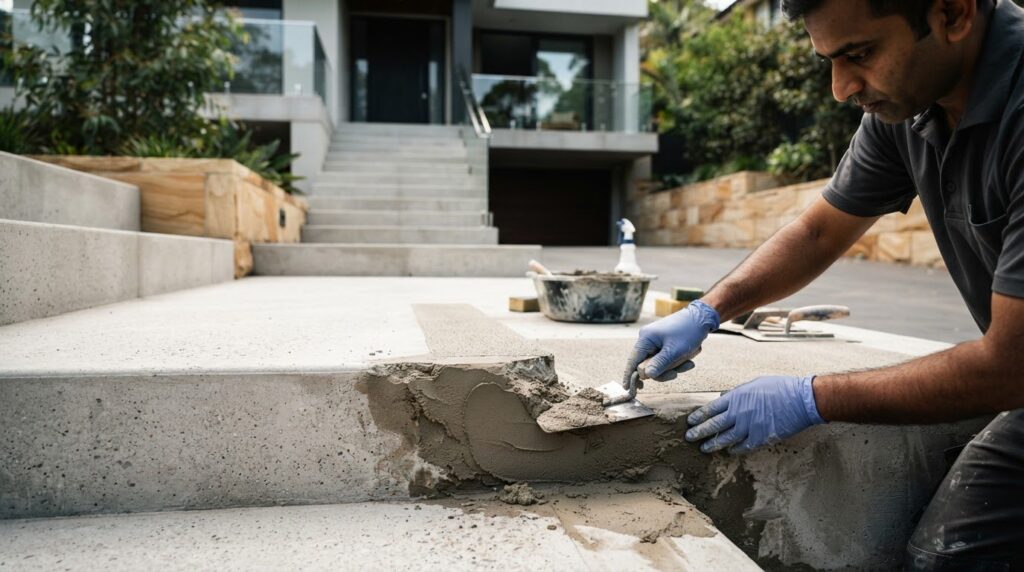
A chipped concrete step is more than a cosmetic flaw: it can leave an edge vulnerable to further damage. To learn how to repair chipped concrete steps, clean the area, remove loose material, dampen the sound concrete without leaving standing water, then press suitable repair mortar firmly into the chip and shape the patch. Fast-set repair mortar may be suitable for vertical surfaces.
It’s tempting to treat a small chip as a minor eyesore and leave it alone. But steps take regular foot traffic, and exposed edges and voids can worsen with use. A careful repair restores a cleaner finish and gives the patch a sound surface to bond to.
This guide explains how to choose repair material, prepare the concrete, fill chips and voids in layers, and finish the patch to suit the step. You’ll also learn when fast-set mortar is useful for vertical repairs and how to protect the finished area while it cures.
Key Takeaways
- Choose repair mortar suited to the chip’s size, depth and position; fast-set mortar can be used on vertical surfaces.
- Prepare a solid, clean repair area and dampen the concrete, removing any standing water before applying mortar.
- Build the patch in layers, pressing the first layer firmly into chips and voids for good contact.
- Shape and texture the surface to blend with the step, and follow the mortar manufacturer’s directions for mixing and curing.
- Protect the repair from foot traffic for 24 hours while it sets.
FAQ 1: Can I use fast set concrete repair mortar on vertical surfaces?
- Yes. Fast-set concrete repair mortar can be used on vertical and horizontal surfaces. Its quicker setting helps it hold its shape on a step riser while you form the patch. Fast-set mortars typically cure within a few hours, but setting and curing are different stages. Follow the product instructions for mixing, application and curing before using the repaired step.
- Remove loose concrete from the chip and surrounding edge before cleaning. Brush dust and grit from the broken piece and the matching surface so debris won’t sit between them. If the piece is sound and you plan to reuse it, clean its mating face too. Remove anything that crumbles or shifts: repair mortar needs solid concrete to bond securely.
- Prepare the repair area only after removing loose material. The concrete must be solid and clean, including the sides and base of any void. Dampen the surface before applying mortar, then remove all standing water. A wet sheen is different from pooled water, which can interfere with application. Pay particular attention to the underside of a chipped step nose, where dust and debris can collect.
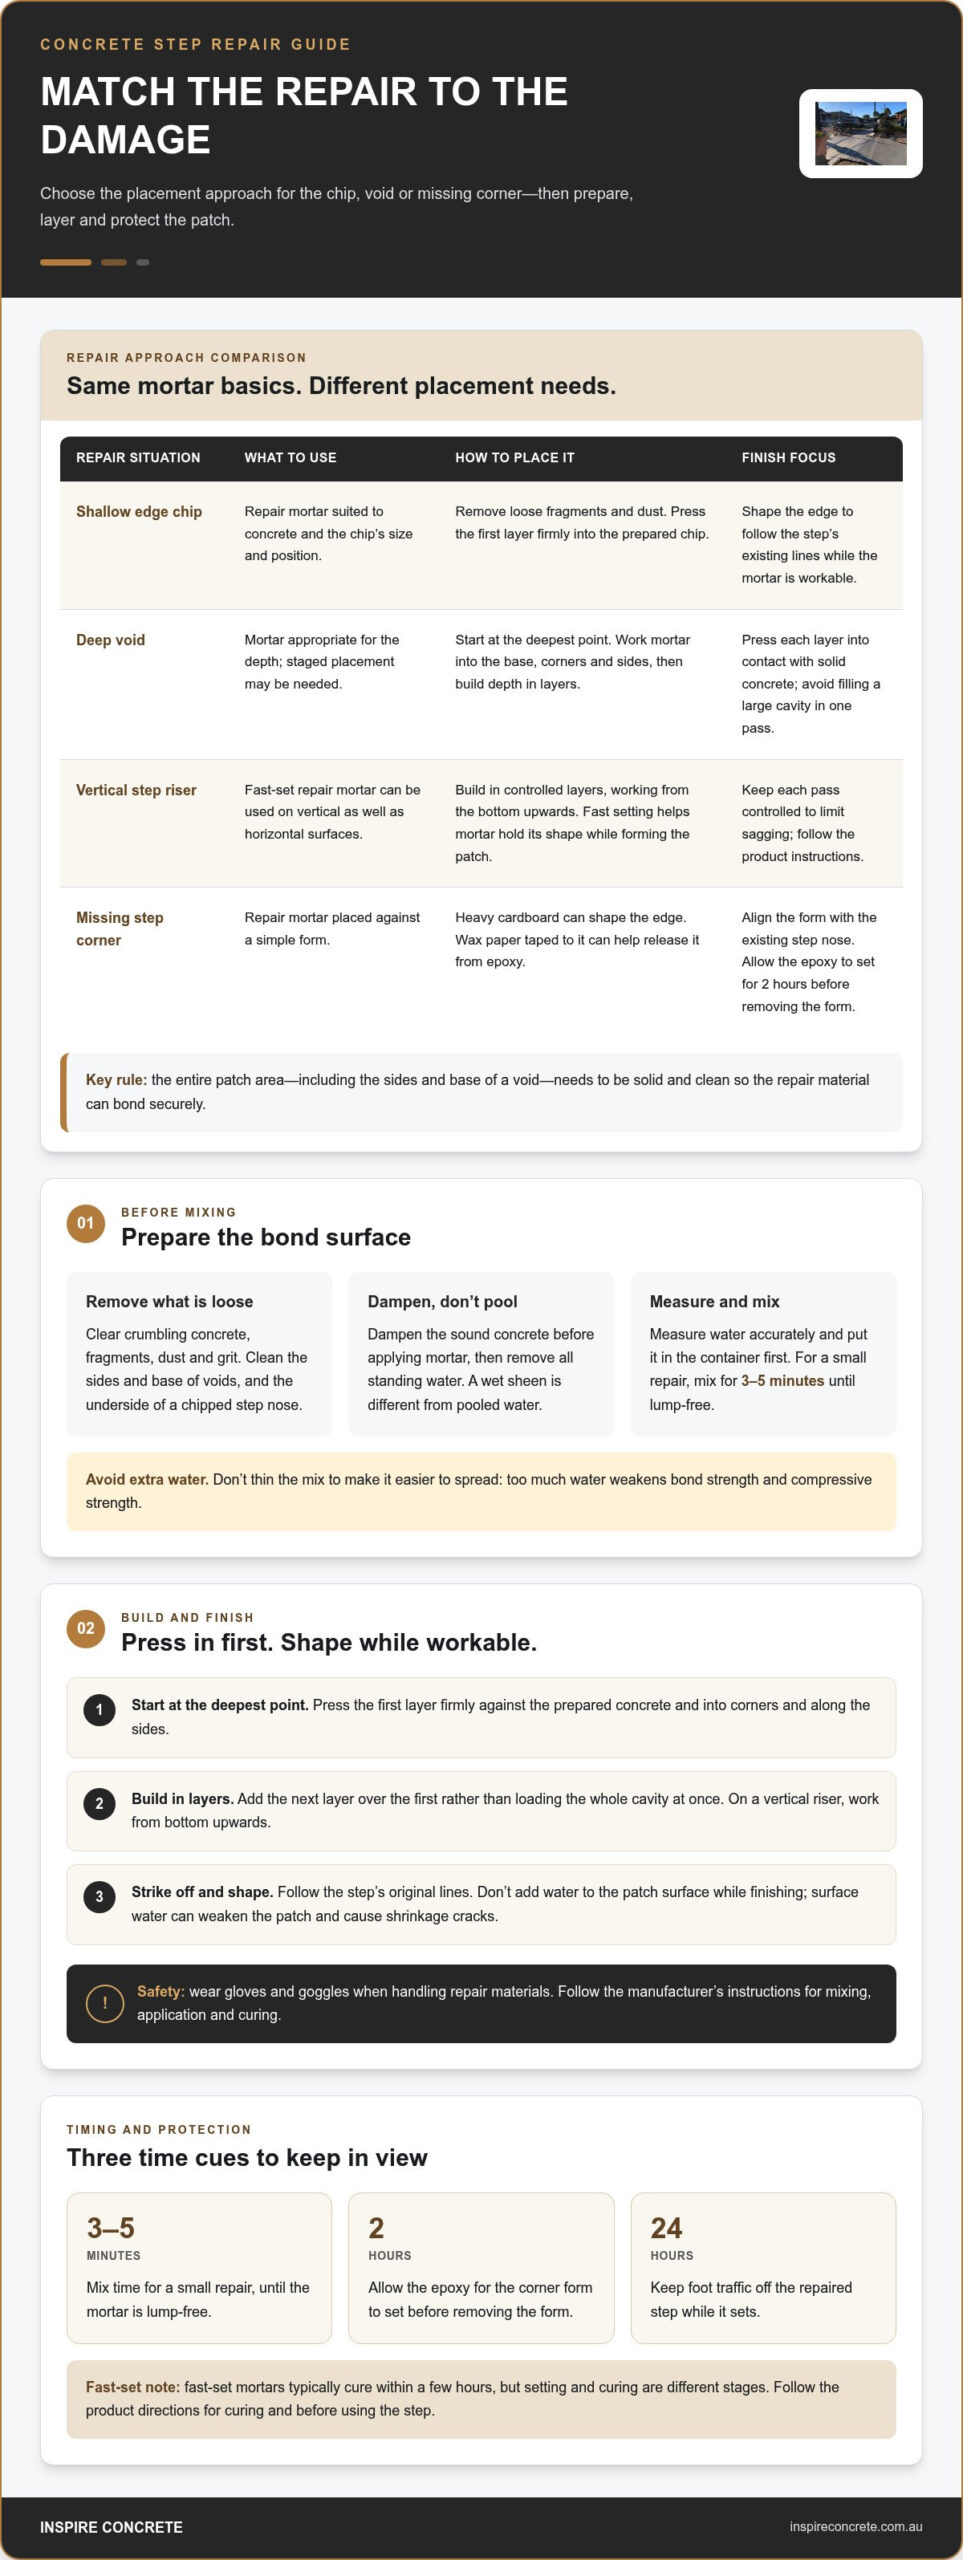
- Measure mixing water accurately and put it in the mixing container before adding repair material. For a small repair, mix for 3-5 minutes until the mortar is lump-free. Follow the manufacturer’s instructions for the product’s water amount and mixing method. Don’t add extra water to make mortar easier to spread. Too much water weakens both bond strength and compressive strength, which matters on a step edge exposed to foot traffic.
- Press mortar firmly into the prepared vertical chip, starting at its deepest point. Build the repair in layers rather than loading the whole cavity at once; this helps the material stay in place and contact the concrete. Shape the outer edge to match the step while the mortar remains workable. Wear gloves and goggles when handling repair materials, and keep foot traffic off the repair for 24 hours.
The essential requirement is a solid, clean concrete surface that lets the repair material bond securely. This applies to the entire area receiving the patch, not just the visible face, so prepare every part of the repair surface. Whether tackling an isolated patch or undertaking broader floor preparation and surface coatings, services like vicconcretepolished.com.au illustrate how thorough mechanical preparation ensures subsequent layers bond reliably.
Applying mortar to chips and voids
Repair chipped concrete steps by pressing suitable mortar into a clean, damp repair area, then building the patch in layers. Shape the surface before the mortar sets, and keep foot traffic off the repair for 24 hours.
- Assess the damage before mixing. Distinguish a shallow surface chip from a deeper void or missing corner. Remove loose fragments and dust, since mortar needs solid concrete beneath it. For a broken step nose, clear the underside too. A stable edge gives the first mortar layer a firm surface to grip.
- Prepare the mixing container before opening the repair material. Measure the water accurately, then pour it into the container first. Add the mortar according to its manufacturer’s instructions. For a small repair, mix for 3-5 minutes until the material is lump-free. Wear gloves and goggles while handling the mix.
- Keep the mortar workable, not runny. Don’t add extra water to make it spread more easily. Excess water weakens bond strength and compressive strength, both important for a step that supports repeated foot traffic. If the mix starts to stiffen, follow the product instructions instead of thinning it.
- Start with the deepest part of the chip or void. Use a small trowel to press the first layer firmly against the prepared concrete. Work mortar into corners and along the sides, where gaps can be hidden. Firm pressure helps the first layer contact the repair area instead of bridging across it.
- Build depth in layers instead of filling a large cavity in one pass. Add the next layer over the first, pressing it into place with the trowel. For a vertical riser, work from the bottom upwards so fresh mortar supports the material above. Keep each pass controlled to limit sagging.
- Rebuild a missing corner against a simple form. Heavy cardboard can shape the edge, with wax paper taped to it to help release from epoxy. Allow the epoxy to set for 2 hours before removing the form. Keep the form aligned with the step’s existing nose for a clean profile.
- Strike off excess mortar with a trowel, following the step’s original lines. Don’t add water to the patch surface while finishing: surface water can weaken the patch and cause shrinkage cracks. Shape the edge neatly, then leave the repair undisturbed as the mortar sets.
- Protect the repaired step from foot traffic for 24 hours. Keep people off the patch while it cures, and follow the mortar manufacturer’s directions for any additional curing care. For broader surface wear beyond isolated chips, concrete resurfacing can provide a more consistent finish across the affected area.
Choosing a repair material for chipped concrete
To repair chipped concrete steps, choose mortar suited to the chip’s depth and position. Gather a mixing container, measuring vessel, small trowel, stiff brush, gloves and goggles.
- Match the mortar to the repair surface. A tread is horizontal and takes foot traffic; a riser is vertical and needs material that holds its shape during placement. Fast-set repair mortar can suit either position. Read the manufacturer’s directions to confirm the intended application and preparation method.
- Assess the damage before selecting a product. A shallow edge chip differs from a deep void or missing corner. Choose repair mortar described for concrete and suitable for the location. A general-purpose mix may not suit every step profile.
- Review the product guidance for application thickness and finishing. A deeper void may need staged placement, while a surface chip calls for careful edge shaping. Match the product instructions to the defect’s shape, rather than choosing by set time alone.
- Consider the existing finish before accepting a visible patch. Plain concrete may blend more readily with mortar than a coloured or decorative surface. Mortar can rebuild a damaged profile, but differences in colour and texture may remain visible. Keep this in mind when setting expectations for the finished step.
- Check whether the selected mortar recommends a bonding agent. Such an agent can improve the lifespan of a step repair, but product guidance determines its use. Don’t apply one automatically; follow the repair system specified for the mortar you choose.
- Set out tools for controlled work. A clean mixing container and measuring vessel help manage the mix, while a small trowel gives control around a narrow edge. Keep a stiff brush ready for surface preparation, and wear gloves and goggles when handling the material.
- Follow the manufacturer’s mixing directions for water measurement and material proportions. The mix affects placement and performance, so avoid estimating or adding water freely. When comparing methods to repair chipped concrete steps, choose a product whose instructions suit the repair’s orientation and depth.
- Prepare only the material you can place within its stated working time. The product directions explain how to handle, finish and cure it. For a corner rebuild, plan how to support the edge while shaping it. A clear repair plan helps match the mortar to the defect.
Finishing and texturing the patch
- Finish the patch while the mortar remains workable. Use a clean trowel to remove excess material and level the repair with the surrounding step. Follow the original profile at the tread edge or riser. Avoid overworking the mortar, which can disturb the surface and leave an uneven finish.
- Check the step’s shape from several angles before the mortar sets. View the tread from above, then inspect the riser at eye level. A straight edge can reveal a raised lip or shallow hollow. Correct the contours with controlled trowel strokes while the patch is still workable.
- Match the texture of the existing concrete instead of creating a polished island. If the step has a smooth finish, make light, even trowel passes. For a rougher surface, use a suitable finishing tool to recreate the surrounding pattern. Test the tool lightly before working across the repair.
- Use a stiff brush for a brushed texture. Draw it across the mortar in the same direction as the nearby concrete marks. Keep each stroke consistent and avoid digging into the patch. On a small tread chip, short, controlled strokes can blend the repair without creating a distinct groove.
- Keep water off the patch surface during finishing. Adding water can weaken the surface and cause shrinkage cracks. If mortar begins to drag, stop and follow the product instructions rather than wetting the patch. Clean tools between passes so dried mortar doesn’t leave scratches or ridges.
- Refine the perimeter where new mortar meets old concrete. Use the trowel tip to define the edge, then soften any abrupt transition without spreading mortar over sound concrete. A neat boundary follows the step’s existing lines and keeps loose material from masking the joint.
- Remove a temporary corner form only at the time directed for its materials. Where epoxy holds a form, allow it to set for 2 hours before removal. Lift the form carefully, then inspect the rebuilt corner. If the edge needs attention, shape it without disturbing the adjoining tread.
- Leave the finished patch undisturbed and protect it from foot traffic for 24 hours. Keep the repair clear while it cures, and follow the mortar manufacturer’s directions for any further care. Before reopening the step, inspect the tread and riser for loose edges, rough projections or an uneven walking surface.
Why chipped concrete steps should be repaired
- Repair a chip before it becomes a larger break. Steps take repeated foot traffic, putting pressure on exposed edges and loose fragments. A damaged tread can also catch footwear or make the edge harder to see. Restore the profile and surface rather than letting the defect spread with regular use.
- Pay attention to the conditions around the steps. Heavy use, ice and salt can make concrete steps more susceptible to damage than other concrete structures around the house. Where these conditions apply, inspect chipped edges and mortar joints for further deterioration. A small repair can address a local defect before more concrete becomes loose.
- Estimate repair cost by identifying the work involved. In Australia, cost depends on the chip’s size, depth, access and finish, and is determined after a quote request. A shallow corner repair differs from rebuilding a missing edge or addressing damage across several steps.
- Choose suitable weather by following the repair mortar manufacturer’s temperature and weather directions. Plan the work for conditions within its stated application range, and avoid exposing fresh mortar to rain. Sun, wind and changing temperatures affect how quickly a patch dries, so consider conditions throughout application and curing.
- Bring in a professional when damage extends beyond an isolated chip. Cracks running across a tread, movement between steps, loose sections or repeated patch failure can indicate a broader problem. For homeowners seeking reliable repair and maintenance support, experienced services like American Handyman provide a helpful example of how professional handymen evaluate and resolve exterior issues before they worsen. A surface patch won’t address movement beneath the concrete, so assess the cause before rebuilding the visible edge.
- Check that the repair area is sound before choosing a DIY patch. If the concrete keeps crumbling as you remove loose material, the damage may extend deeper than the visible chip. Extensive deterioration across multiple treads also calls for a broader assessment rather than several small surface patches.
- Reduce repeat chipping by keeping steps clean and watching their exposed edges. Remove debris that collects around damaged spots, and avoid striking corners with heavy objects during nearby work. Address new cracks or loose fragments early, before foot traffic further breaks the weakened edge.
- Consider a consistent surface treatment when wear affects more than one small spot. For broad surface deterioration, concrete resurfacing can renew the appearance across a larger area. Keep the decision tied to the concrete’s condition: isolated chips suit local repairs, while widespread wear needs a more cohesive finish.
Inspire Concrete: Exposed Aggregate Driveways
Inspire Concrete creates exposed aggregate driveways for properties where a durable surface and distinctive finish matter. If chipped steps are part of wider wear around your home, a broader concrete project may help bring the surrounding areas together. Choose from exposed aggregate, stencil, stamped or coloured concrete driveway finishes to suit your property’s style. Each offers a different visual character, from visible aggregate texture to patterned or coloured surfaces. These driveway services suit new projects or upgrades rather than a small, isolated step repair. For a cohesive exterior, consider how the driveway finish relates to nearby paths and entertaining areas.
To discuss a concrete driveway project, contact Inspire Concrete.
Plan the next improvement with confidence
Knowing how to repair chipped concrete steps can help you make a focused repair and decide what needs attention next. Look beyond the patch: consider whether surrounding concrete needs a refresh or whether your plans call for a broader exterior upgrade. Inspire Concrete offers exposed aggregate, stencil and stamped concrete driveways for property projects where finish and function work together.
Choose the next step based on the scale of the work you have in mind. A small, isolated chip may only need a careful repair. Wider wear or a planned driveway upgrade calls for a more considered approach to the surface and overall design.
For a concrete project that extends beyond a small patch, contact Inspire Concrete to discuss your plans. Take the next step toward a clean, considered finish for your property.
Frequently Asked Questions
FAQ 2: How long does it take for the repair to cure?
Fast-set mortar typically cures within a few hours, but that doesn’t mean the step is ready for use. Keep foot traffic off the repair for 24 hours. Follow the product’s instructions for curing, since the material and repair conditions affect its care. For example, a patched step nose still needs protection even after the mortar feels firm to the touch.
FAQ 3: What safety precautions should I follow during the repair process?
Wear gloves and goggles when handling concrete repair materials. Keep the mixing area organised, place tools where they won’t create a trip hazard, and keep people away from the work area while you patch the step. Follow the mortar manufacturer’s handling instructions, including guidance for mixing and cleaning tools. Avoid touching wet mortar with bare hands, and wash exposed skin promptly.
Why repair chipped concrete steps?
Repair chips before regular use breaks away more concrete. Steps face repeated foot traffic, and heavy use, ice and salt can make them more vulnerable to damage. A chipped tread edge can also leave an irregular surface where shoes land. For example, if a corner crumbles further, the repair may need to cover more than the original defect.
How do you prepare concrete steps before applying a repair mortar?
Remove loose fragments and debris until the repair area is solid and clean. Brush dust from the chip, its sides and any broken piece you plan to reuse. Dampen the concrete before applying mortar, then remove standing water. Check the underside of a step’s projecting edge too, where dust can remain hidden and interfere with contact.
Which concrete patching products are suitable for outdoor steps in Australia?
Choose a concrete repair mortar whose manufacturer’s instructions suit the repair’s location and application. For outdoor steps in Sydney, look for product guidance covering exterior concrete and the surface orientation, such as a vertical riser or horizontal tread. Match the material to the chip’s shape and depth. Check whether the instructions recommend a bonding agent, rather than adding one automatically.
How do you mix and apply concrete repair mortar to a chipped step edge?
Measure the mixing water accurately, add it to the container first, then mix in the repair material as directed. For a small repair, mix for 3-5 minutes until lump-free. Press the first layer firmly into the chip, then build up the patch in layers. Don’t add extra water to improve spreadability, because excess water weakens bond and compressive strength.
How long does concrete step repair take to cure before use?
Keep people off a repaired step for 24 hours, even if fast-set mortar typically cures within a few hours. A quick set doesn’t mean the patch is ready to take foot traffic. For example, keep children, visitors and pets away from the step during that protection period. Follow the product’s curing directions as well, since they guide when the repaired area can be used.
